Tuesday, October 19, 2010

How to Shade Across a Drawing


Shading a face is challenging . . . the hair, the chin, the eyes. Trickier still can be shading a face across the entire page. Let me explain.

To understand how to shade a face (or any subject for that matter) across the entire page, just answer one question. In the following example, the strongest light comes from the front-top-left. How does answering this question help you understand?

Knowing that the strongest light comes from the front-top-left tells you where the lightest part of the entire drawing is—the top left! Any point closest to the strongest light source is always brightest, even if you can’t discern that with your naked eye. And since light travels in a straight line here on earth, the side opposite that brightest spot (where the light hits your subject last) will be the darkest—the bottom right! You can see what I mean in this example, where I've shaded the paper without the face.

Now I put the two examples together. The face goes from having been shaded, to having been shaded across the entire page.
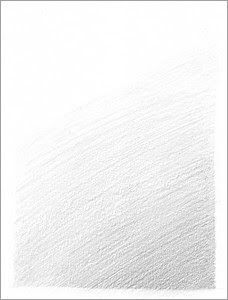


Shading across an entire page can get even trickier. For instance, what if there were more than one light source? What if there were more than one subject? And what if these subjects were different distances from the viewer? I'll be writing about these later!

Monday, October 18, 2010

Pencil- Highly benefitting thing near to you. For more details at http://tinyurl.com/29tmp8q

Pencil- Highly benefitting thing near to you

"Pencil" the first ever writing instrument you held on your hand as a child. Whether it's a great educationist or scientist, everyone learned alphabets and numbers with a single pencil. What is the first thing you take in your hand when you need to describe or mark something? Obviously, it would be a pencil. A child̢۪s educational career begins with a pencil. We generally describe pencil as an example for a simple thing. They are easy to hold and considered to be the cheapest writing material that the world had ever seen.

Have you ever imagined that without a pencil how the world would be? Art would not have emerged, without the invention of pencil. Right from Da Vinci to Picasso, they started their artistic career with a pencil. It is also estimated that with a single ordinary pencil, you could draw a line of 35 miles long and write an average of 45,000 words. It has become a dominant thing in our day to day life. It is predicted on average that each of us need the assistance of a pencil at least once in a day. They are usually used in the field of art, education, communication and design.

Pencils, being the greatest technological inventions of all time, are used by people in several fields. In addition to school and college students, pencils are commonly used by writers, news reporters, engineers, carpenters, composers, scientists, teachers, business people, parents and more. Now-a-days pencils come in different heights and styles that could get the attraction of small children. The craze and demand for colored pencils has never gone down among kids.

Pencils.com adds NEW Earth-Friendly Items


Pencils.com has expanded our range of environmentally responsible pencils and notebooks with the addition of several new products from Green Apple and Banana Paper to complement our existing “Green Product” offerings under our ForestChoice brand of FSC Certified wood pencils.

Green Apple is an Earth friendly pencil produced from Genuine Incense-Cedar wood grown in the forests of California and Oregon. Our two new Green Apple pencils include a 10-count ergonomic triangular #2 pencil pack as well as their 4-count Jumbo Highlighter hex pencils. The triangular pencils are produced from finger-jointed wood slats reclaimed from the slat manufacturing process to reduce waste. The dry text liner pencils have four attractive colors and are a safe and non-toxic means for highlighting your reading materials. Both pencils have a natural wood surface and are paint-free. Green Apple has a growing range of Earth-Friendly school supplies that Pencils.com hopes to add over time to further expand our selection of environmentally friendly products. All Green Apple packaging is made from recycled paperboard.

The Banana Paper Company produces environmentally friendly tree-free, acid-free, natural paper and paper products. These products - produced in Costa Rica - are made using tropical agricultural wastes reclaimed from traditional production of items such as: Bananas, coffee and pineapple. The paper used in these products is made from 80% post-consumer waste fiber and 20% banana leaf fibers and requires 70-80% less energy to manufacture than virgin fiber paper. The Banana Paper Company is based on the belief that human growth and the well-being of our environment can be attained in a sustainable way. Banana paper designs and manufactures all of their banana paper and banana paper products all the way from its raw materials to the shelf.

The initial Banana Paper items now available on pencils.com include:

-Banana Paper Notebook, Kraft Fauna Collection

(4 Cover options)

-Butterfly, Monkey, Dolphin & Toads

-Banana Paper Journal, Sketches Collection

(2 Cover options)

-Red Hummingbird & Green Frog


We have also added a new Maped Natural Eraser product.

We at Pencils.com are excited to expand our offerings of earth friendly pencils and writing supplies to build upon our longstanding company commitment exemplified by our ForestChoice product range. For more about our company’s dedication to produce and market environmentally responsible products, Click here.

Thursday, October 14, 2010

10/14-10/17 'Just Because' SALE!


October is Breast Cancer Awareness Month! Pencils.com is giving away a Pink Kum 2-hole pencil sharpener with the minimum purchase of two 12-packs of our Breast Cancer pencils. This offer also applies for order a minimum of 1 bulk of the Breast Cancer pencils. A portion of the proceeds will go towards Breast Cancer Research. Help the cause and purchase your Breast Cancer pencils! This offer is only good through Sunday, so buy your pencils today!

Promotional Code: FREE SHARPENER

Tuesday, October 12, 2010

Drawing Rocks


Here is the reference photo in color that we will be using for the rest of this tutorial. A grayscale photo can help to match the tones, but color helps in the details.

Diane Wright is a very talented artist that will be posting more of her tutorials on pencils.com over time! Visit her website for more tutorials or you can buy her book on landscaping. She has 2 blogs that she updates regularly (here and here) and allows commenting...feel free to ask her any questions that you may have.

Step 1

We are going to draw the large boulder on the left. I start with a 2B pencil and sketch in the darkest areas. The lighter areas are sketched in using an F lead weight. Using short random marks, I concentrate on the indents and shadowed areas. Be sure to draw in all of the darkest areas in this step (I will explain further in the third step)

Step 2

Once you have the preliminary details drawn, use the clutch pencil with a chisel edge to apply a smooth even layer over the surface. The lighter areas I use the 4H, and use 2H in the shadowed areas. Remember the planes and angles for lighting.

Step 3

Now the fun starts! Using a softer lead in the mechanical pencil, start creating the texture! I use random short marks to create pits and a rough surface. That's right; use a softer lead over the harder lead. We all know that using softer lead over harder lead creates a very uneven surface. But it works wonders in creating a random, uneven texture for rocks.

The chisel edge is important as it creates a flat wide mark. To create a chisel edge, use sandpaper; angle your pencil and scrub!

Using these harder leads may be new to some of you, but they create wonderful light values that otherwise would be very difficult to achieve.

Continue building and layering. Use the Blu-Tack to create subtle highlights. Press the Blu-Tack onto an area and lift the graphite off. Use the battery-operated eraser to create small strong highlights.

I mentioned in step 1 to be sure you have all your darkest areas drawn before you proceed onto step 2. The reason should be obvious. Once the harder lead is laid down, you will not be able to achieve those rich blacks!

Here is my completed rock study...

Monday, October 11, 2010

"Man It Feels Good to be a Pencil"

Sean Sanczel has created a new Pencilman video! I never realized the amount of musical talent that Pencilman had until today. Great animation by Sean! It's always fun to see a new Pencilman video. Check out more of his Sean's videos on youtube. Maybe the Pencilman will meet the Palomino Blackwing in the future! Thanks Sean...